Sunday, November 20, 2011


My question has not yet been answered by the Ask a Scientist website.

If the scientists do typically respond in a timely fashion, I would love to use this website with my students. I occasionally get asked higher-level questions that I am unable to answer. This would be a great place for students to go for a resource and then share the information they found with the class. Hopefully I will find that others had better luck receiving an answer to their question!

Sunday, November 6, 2011

Cool Tools for School


Wow, I had no idea how many neat Web 2.0 tools were out there! I can't wait to get more familiar with the tools and incorporate them into lessons with my fifth graders. Here are my thoughts on a few I have checked out so far:

Prezi: The tutorial was great, and the program looks easy to use. I like the presentation with pictures and text all visible. The movement of the presentation make it interesting to the viewer and easy to zoom in on the text one wants to see.
http://prezi.com/

Viddix: I like that this tool allows a dual screen: one for video and the other for text or pictures. You have to have a webcam or a video recorder to upload video. I think would be fun for students to give a presentation, but do not prefer it for the course project because I would rather not talk through the information on video. I also thought the website and instructions for the tool were quite complex.
http://www.viddix.com/

Museum Box: I liked the historical aspect of this site. It provides a good visual layout of pictures with the opportunity to add additional text. The thematic part of this tool is great! I think my students would enjoy creating a museum box, but I would use it when pictures are the primary part of your presentation. These look fairly easy to create.
http://museumbox.e2bn.org/

Letterpop: I loved this site. The introduction was simple and instructions were concise and easy. This would be a great way to make a brochure, newsletter, or flyer on a topic. You can then share it using social media sites or email. In fact, I may try to make my next monthly class newsletter on this site! You could present information for the organism project easily.
http://letterpop.com/

Gloggster: An easy to use site where you can create posters of information. I like this idea, but would not choose it for the endangered species project because I feel it might be difficult to arrange the various topics of information in a way that would be easy for the viewer to see.
http://edu.glogster.com/

Sunday, August 7, 2011

Keeping Up with the 21st Century


It is crucial that our learners become thinkers. The students we teach today are going to be taking jobs that do not even exist today. Employers will not be looking for a book smart individual who can spout off facts and dates. They will need employees who can think on their feet, collaborate with others, create new solutions, develop new ideas, and problem solve. As teachers, it is our responsibility to mold this type of learner.

With the endless ocean of information at our fingertips through the internet, this is one place that we need to take our students to learn. One engaging science website I found is Steve Spangler's Science Blog. http://www.stevespangler.com/tag/middle-school-science-fair-projects/
On this site, you can even sign up to get an email of the experiment of the week.

A topic that I decided to learn more about is sound. We spent some time during this class focusing on the properties of sound. I found it interesting, but it took a lot of exploring to finally grasp some of the concepts. I started thinking about things my students are interested in but don't know much about. I settled on sound because many of my students play instruments and/or are in our school musical which is quite a production with sound and lights.

Audible.com is a great site where you can download a program on your computer to create different sound bytes. We explored this in one way in class, but it can also be used to create podcasts or other recordings. Students can see the sound waves and create patterns in their recordings. They can also use this in reading to hear how fluid their voice is when reading out loud. Another idea is to use it across the curriculum, such as recording a radio show from the 1920's in social studies.

http://www.nationalgeographic.com/xpeditions/activities/10/gasounds.html is an interesting site that helps you create a "sense of place" with sounds. At my house, it would be a mixture of crickets chirping, a dog barking, baby laughing, and cars speeding down the interstate. This is home!

Go to the following site to find out how the pitch and loudness of instruments can be altered. http://www.bbc.co.uk/schools/scienceclips/ages/9_10/changing_sounds.shtml It is animated and fun for kids.


Sunday, July 24, 2011

Heat Transfer Investigation

For the weekly experiment exploring heat transfer, I chose to use common materials from my kitchen. The four materials I used were a rubber lid opener, aluminum foil, plastic Saran wrap, and a Bounty paper towel. I have found myself covering food with several of these materials in the past, so I thought it would be interesting to learn more about each of their properties in relation to heat.

After letting water sit in identical mugs, each covered by one of the materials, for thirty minutes, I retested the temperature of the water. The results showed the water in the mug covered by aluminum foil was the warmest by one degree Celsius. This was interesting to me because when I first came up with my hypothesis, I almost wrote foil would have the hottest water. I often use this material to cover food out of the oven to keep it warm until dinnertime. Yet, when I thought harder, I realized that aluminum foil is actually a conductor, not an insulator. This realization made me think that heat would not have been as efficiently held in the water as it would with one of the insulators, rubber, for instance. So much for what I know!

The water covered by foil was the warmest followed by plastic Saran wrap, the rubber lid opener, and the coolest was the paper towel. These results make me believe that foil, plastic, and rubber are good insulators. I might test this experiment again to verify the conclusion.

In addition to repeating my exact experiment, I think it would be fun to try out other variables. For instance, I would like to know if I would get similar results if I changed out the water with a different object. I mentioned previously that I use Saran wrap and aluminum foil to cover meals at home if I want to keep them warm. I might test a chicken breast or tomato soup to see how much heat they lose when covered by the same four materials I used. I would think the rate of heat lost may have something to do with surface area and the properties of the food. I would think that water would lose heat quicker than chicken.

Not only would I try changing the substance being tested, but it would also be interesting to change a different variable such as the type of container in which the water is being held. I would test the original mug, a plastic cup, a tin can, and a Styrofoam cup. I would think the Styrofoam cup would aid in insulating the water and therefore slowing the release of heat. There are endless combinations of variables to try out in relation to heat transfer. I enjoyed this experiment. If you try it, have fun!

Sunday, July 10, 2011

How Do Different Surfaces Affect the Momentum of Marbles?

In my experiment, I set up a stack of books six inches high and then connected an additional hardback book as a ramp leaning against the stack. This became the incline which marbles rolled down and the selected surface. Precisely two feet from the bottom of the ramp, a string was laid across the floor surface. The procedure of this experiment was to let go of a marble at the top of the book ramp and record the amount of time it took for the marble to roll down the ramp, across the testable surface, and reach the string. In other words, the velocity of the marble was recorded. In order to capture accurate results, two different marbles (one small and one large) were tested on each of the surfaces. Four different surfaces were used: a smooth laminate countertop, a hard-wood floor, a level, compacted carpet, and a shag rug. Each marble was tested five times on each surface to ensure truthful results.

The mean time (in seconds) of the five tests was calculated and is reported in the results below:


Small marble

Large marble

Smooth laminate countertop

0.5

0.4

Hardwood floor

0.6

0.5

Compacted carpet

1.0

0.9

Shag rug

Did not reach two feet before stopping

Did not reach two feet before stopping

The speed on both smooth surfaces was nearly half the time it took the marble to reach the two foot marker on the carpet. The conclusion of this experiment is that the more friction a surface area provides against a marble, the less momentum the marble will have. Additionally noted is that the larger the mass of a marble, the greater its speed. These were the results I expected to get based on my knowledge of momentum and friction. I knew that friction works to slow an object down.

The procedure of this experiment went well and provided accurate results. I did have to recruit an assistant (my husband) to help release the marble while I timed it. These jobs were too difficult to perform accurately at the same time.

Changes that could be made to this experiment in order to get different results would be to alter the plane of the ramp, use cars or other rolling objects instead of marbles, and test the procedure on still more various surfaces. I would also be interested to see if the difference in the time of the small and large marbles would increase if the distance to the target or string was increased.

I think my students would have fun setting up this experiment in my classroom. The materials used are all basic classroom supplies. Students could decide on something about the experiment to change and see how the results would be different. In order to make this more engaging for my class, I would have to relate it to something they would be interested in. Maybe, I would have them design a new slide for the playground. Depending on how fast or slow they like going down slides, they would have to determine what kind of material to use to make the slide.

All in all, if my students learn that friction affects the momentum of an object by slowing it down, the goal will have been reached. Truthfully, I would be happy that my students could successfully participate in a guided inquiry experience in which they have to be creative and problem solve!

Sunday, June 12, 2011

Structured Inquiry Lesson: What is a Scientist?


The lesson I implemented this week with a small group of students was an inquiry into the
life of a scientist. Students were first asked to respond to the question, "Are you a scientist?" They had to tell why they did or did not believe so. I was pleasantly surprised that all students did indeed see themselves as scientists! This is the first step toward getting my students hooked into a path toward a STEM (Science, Technology, Engineering, or Mathematics) career.

The next part of the lesson called for students to imagine a scientist in their head, then t
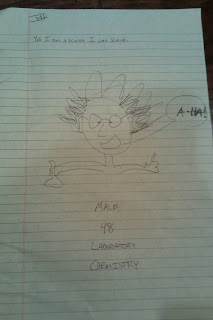
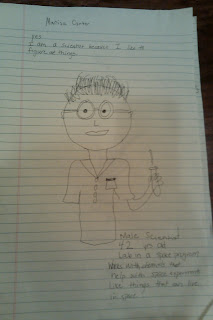
o draw a picture of the image. The results for this were similar to what I expected as many of the illustrations depicted a caricature-type image of a mad scientist (see pictures). Four out of five were male, four of five had wild hair, three of the scientists wore a lab coat and were drawn with some type of test tube or beaker of chemicals, and all five scientists had glasses. The average age of the five scientists imagined was 68 years old. Even without prompting, the most common scientist drawn was a male over 60 years old working with chemicals wearing glasses, a lab coat, and wild hair. The results were contradictory, though. All my students thought themselves to be scientists, but when asked to draw a scientist immediately after that discussion, they drew scientists that did not resemble themselves in the slightest. When asked questions such as if a scientist has to wear glasses, all five students said no. Yet, all their scientists were drawn with glasses. This indicates that although students may picture a stereotypical scientist, they do understand these are not realistic characteristics.

Finally, students participated in a Promethean lesson in which they were shown pictures of ten scientists of varying ethnic backgrounds, ages, and genders. They had to match the picture to the career they thought that person held, such as an aviator, computer scientists, or marine biologist. Then, students were given a clue about the person's accomplishments, and they had to guess again. The purpose of this activity was to help students see two things. One, anyone can be a scientist: male, female, white, black, young, or old. Two, students saw that there is a wide range of careers scientists can hold. It is not just about working with chemicals in a laboratory!

As an extension, students were asked to go home to briefly research a science career they were intrigued by to share with the class the following day. I thought this lesson was successful in that it got students thinking about what science really is and the opportunities it holds for them in the future.


Sunday, May 22, 2011

What happens if the polar ice caps melt?


The effect of melting ice caps promises to be extensive. It could change the entire make-up of the ocean. Polar ice caps contain fresh water, so when they melt into the ocean, it will cause the ocean water to have a lower concentration of salt. This could in turn affect the plant and animal life if they do not properly adapt to it. The diluted salt water could also affect ocean currents. The way that currents flow has to do with the salinity of the water.

Another concern of polar ice caps melting is the risk of ocean overflow. The amount of water melted into the ocean could possibly cause flooding and loss of low level land. The effects of this would be devastating for many humans living along coasts, but that's not it. Changes in crops and living space near the coast could affect humans living in all areas!

I like this experiment because it makes you think. Investigative science is a wonderful way to learn!

Sunday, May 15, 2011

Lesson Plan Reflection

What I enjoyed most about this lesson plan is the fact that I will get to implement it next year with my fifth graders! My lesson involved students creating earthquake proof buildings which are tested on a shake table to simulate a real earthquake.

I found the 5 E's strategy helpful, though it was a much more extensive than I am used to using for planning a single lesson. I do naturally follow these guidelines, including an Engagement (an anticipatory set), Exploration, and Explanation. I liked coming up with ideas for the Elaboration step of the planning process. Enrichment activities are something I always enjoy but often find myself out of time to actually follow through with them. Time is one of my worst enemies as a teacher! I also liked the Evaluation step because it reminds me to slow down and think if my students have truly absorbed the material as I hoped they would. Do they really understand it? Could they take it a step further? What additional questions do they have? The whole point of a lesson to for the students to learn, so this step ensures the success of the task. Learning should be engaging, and I like that the 5 E's model reinforced that students should be engaged at all times.

If I were to actually implement this lesson in my classroom, I would need to make sure I had plenty of supplies for the students to use. I would also need to allow sufficient time for students to build their buildings. Part of my anticipatory set is to have a guest speaker from the Red Cross talk to my class about working to aid in earthquake relief in Japan. This may be a hard person to secure to come to my classroom. As a back up plan, I would show the students pictures and video clips on my Promethean board from the devastation caused by the 2011 earthquake in Japan.

I felt the hours it took me to create this lesson plan are not something I will, or even could if I wanted to, reciprocate in my everyday lesson planning. I am not only a science teacher, but additionally teach reading, math, social studies, grammar, and writing. I just do not see how it is possible to create this extensive as a plan for every lesson I teach! That being said, I do believe this planning process helped me focus on the important parts of the lesson. I am excited that I have a really good lesson to use next year!!